Journal of Biomedical Engineering and Medical Devices
Open Access
ISSN: 2475-7586
ISSN: 2475-7586
Research Article - (2024)Volume 9, Issue 3
In recent years, radiation thermometers or infrared thermometers are frequently preferred in many different sectors from the health sector to the iron and steel industry, food, agriculture, chemistry and automotive, due to their fast measurement capabilities, reasonable prices, wide measurement ranges and practical use. In this study, the calibration systems of infrared clinical radiation thermometers, which are widely used in our hospitals and homes and become more important with the sudden expansion of their usage areas (closed areas, meeting rooms, shopping malls, schools and offices), especially during the COVID-19 period, were investigated. The measurement of human body temperature is an important physiological measurement used primarily for diagnosis, surgery, especially during pandemic diseases such as COVID-19, intensive care and treatment procedures. Different types of clinical thermometers are used in body temperature measurement and we can examine these thermometers in two groups: Contact thermometers and non-contact thermometers. To have confidence in the accuracy of the measurements of the temperature measuring device, clinical thermometers, it is important that the device is calibrated traceable to the 1990 International Temperature Scale (ITS-90).
Infrared thermometers; Ear thermometer; Blackbody radiation; Temperature metrology; Measurement uncertainty
Although measuring body temperature with optical systems is not as reliable as using traditional methods (glass thermometer, electrical thermometer), in routine clinical applications they have largely replaced the classical methods [1]. In the field of body temperature measurement, clinical studies in recent years have focused on practical infrared tympanic (ear) thermometers that can measure accurately, reliably and quickly, with less invasive contact [2].
Clinical infrared thermometers are used to measure the temperature of the tympanum (ear drum) in the range (36°C-41°C), and it is important that they are properly calibrated and used. Otherwise, it may lead to bad results, wrong diagnosis and treatment. Calibration of clinical thermometers is done using a reference source of infrared (heat) radiation, and this is conveniently provided by a ‘black body’, a cavity with black interior surfaces kept at a uniform temperature.
The cavity then has a radiation ‘emissivity’ which is close to the maximum of 1, and the radiation detected through a small aperture in the cavity is closely related to the cavity temperature.
An important need for accurate measurement and reliability of measurements. The most important part of the calibration system of infrared thermometers is the blackbody. The basic optical properties of black bodies are their emissivity and reflectivity. The infrared thermometer measurement method relies on having some knowledge of the emissivity (emissivity) of human skin, because human skin is not blackbodies: The radiation they emit is always less than ideal [3]. The most basic problem in measurements is the black body sources used in the calibration of all radiation thermometers. These systems do not pose such a problem in the calibration of an industrial type infrared or radiation thermometer because the operating range of the thermometer is not as specific as human body temperature and does not require low uncertainty, but if you are in measuring the temperature of the human body, the error or uncertainty of 0.5°C is very important. For this reason, the calibration system needs to be specially designed to measure with high precision. ASTM 1998, EN 2003, JIS 2001 measurement systems designed for calibration depend on multiple parameters such as surface shape, paint, material from which it is produced, and even small differences in the specified conditions can affect the measurements [4]. First of all, it is important that the temperature environment into which the cavity will be placed is stable and homogeneous. Therefore, instead of systems such as block calibrators, heat sources with high thermal conductivity such as stirred liquid baths will play an important role in reducing uncertainty [5]. In the cavity design, the cavity with the closest emissivity value (є˃0.95) to the human skin will be designed and tested [6]. The material of the cavity and the coating technique are important at the design stage. The coating process is the first stage of the process and after the process is completed, it is necessary to determine the emissivity correctly. It is important to correctly determine the emissivity value of the produced cavity, which directly affects the measurements, and at this stage, emissivity determination will be performed in a traceable manner with pyrometer? Measurement, which is one of the methods in the literature [7]. Just as the emissivity value of the designed measurement system is important, the emissivity value of the clinical infrared thermometer to be calibrated is also very important. A radiation thermometer accurately measures temperature only when its instrumental emissivity is set equal to the emissivity of the measured surface (target). Therefore, in practice, it is important to know exactly the target emissivity and be able to set the same value on a radiation thermometer. Infrared thermometers basically have no means of adjusting the instrumental emissivity [8].
The prohibition of mercury in glass thermometers used in the measurement of human body temperature, has had an important effect on the development of new clinical thermometers. The restriction of the use of liquid glass thermometers and the high uncertainty and cost of electrical? thermometers have increased the popularity of radiation thermometers [9].
Numerous blackbody system designs have been developed (bathtype cavities, oven-type cavities, and fixed points) that meet the radiation thermometer calibration requirements [10]. Blackbody systems are limited for calibration of clinical-grade thermometers (Tympanics). Vertically oriented submersible blackbody designed from international standards is used for contact type thermometers. While producing the blackbody cavity system in accordance with the defined standards, the manufacturer has to provide all the parameters perfectly, otherwise the measurements will be inaccurate, and if the laboratory that performs the post-production measurement does not have a reference to compare or an interlaboratory comparison measurement that it can participate in the comparison measurement, it will not be able to understand the error it made in the measurement [11]. There is no standard calibration method and system for non-contact clinical thermometers [12].
It is seen from the studies in the literature that standard blackbodies are used in non-contact thermometers, which are costly to produce and depend on many parameters.
Vertically oriented submersible blackbodies are suitable for use in liquid baths and liquid baths are ideal due to their low measurement uncertainty. Horizontal type (flat plate) blackbodies are mainly used in furnace systems and the uncertainty of these furnaces is higher than in baths. In vertical systems, the thermometer focuses inside the cavity and the radiation has no effect of exposure to other external effects, but in horizontal systems the system is open, the beam is focused on a surface, it is inevitable that it will be affected by other ambient radiations at that time [13].
The first aim of the present study is to compare the measurement results of standard blackbody cavity and nonstandard low-cost and simple-to-manufacture contact IR thermometers produced in our laboratory. Another important aim is to investigate whether it is possible to calibrate noncontact thermometers, which do not have a standard calibration system, with an acceptable uncertainty by measuring them with these two blackbody systems.
Theory
Blackbody radiation, also called cavity radiation, is an object that absorbs all directed radiation and re-radiates system-specific energy [14]. The measuring principle of infrared thermometers is based on black body radiation. Emission is defined as the ratio of the energy emitted from the surface of a material to that emitted from a perfect emitter, known as a blackbody, under the same temperature, wavelength, and visibility conditions. The emission (ɛ) value of the objects is between 0 and 1. Emission surfaces with zero emission value have maximum reflective surface; if the emission value of the object is 1, it is called 'black bodies' and these surfaces absorb all the radiation. Even though an object has an emission value of 1 in theory, it is not possible in practice [15]. The emissivity value of the object changes depending on some parameters related to the material of which it is made, for example, the roughness of the surface, its oxidation state. The first condition in temperature measurements is to determine the emissivity value correctly and to measure at the correct emissivity value. Another important condition is that the emission value changes according to the temperature, wavelength and the angle at which the measurement takes place [16]. After determining the correct emission value, it is necessary to convert the measured signal to temperature accurately in the measurement of radiation thermometers [17].
When we study the surfaces of bodies, no surface has an emission high enough for direct use as a blackbody source, but we can use the concept of true blackbody radiation at a uniform temperature in a closed space. It depends only on wavelength and temperature, and it doesn't matter what the emission of the material from which the cavity is produced. If this were not so, the second law of thermodynamics would not work, heat could be transferred from one part of a cavity to another without a temperature gradient.
Standard blackbody sources are used to calibrate radiation thermometers. Black bodies can be placed in a bath or oven as a thermal medium, or black body calibrators designed for direct calibration can be used. [18].
Experiment
The basic measuring principle in temperature calibrations is based on the zeroth law of thermodynamics; if the two systems interact with each other, they will reach thermal equilibrium after a certain period of time and have the same temperature. For this reason, it is one of the most important steps to create this temperature environment in the measurement setup, that is, in the calibration system. The temperature environment is created using heated furnaces or liquid baths. In this study, special calibration baths (Fluke 7341, Hart scientific 7037) with very low stability and homogeneity were preferred, since it was aimed to develop a calibration system for infrared thermometers used in body temperature measurements and since it is the most important condition that the measurements are carried out with high accuracy and low uncertainty. In researches with liquid baths, it is known that the stability value of an average liquid bath is around ± 0.01°C. Although there are cavity studies in the literature for clinical thermometers, no measurement system design or study using different types of clinical thermometers has been found. The basic principle in temperature calibrations is to compare the thermometer to be calibrated with a reference thermometer in a temperature source, the comparison method according to ITS-90 is used in comparison measurements. In this study, as mentioned above, a liquid bath will be used and the actual temperature of the liquid bath will be measured by reference thermometers. All temperature measurements will be made with the Hart Scientific and Fluke brand Standard Platinum Resistance Thermometers (SPRT), the most sensitive thermometers that can be used.
Apparatus
The main apparatus utilized consisted of water bath (Hart scientific), reference thermometer-862 PF-100 (Hart scientific), 3030 ear infrared thermometer (Braun), two infrared noncontact thermometers, a blackbody 1-EN 12470-5 (0.95-0.97), and blackbody 2–regular 31 cm blackbody with emissivity 0.99.
Method
The experiment was conducted using two different blackbodies: Blackbody 1 (standard EN 12470-5) and blackbody 2 (normal 31 cm blackbody). This was conducted to analyse the difference between results of both data and compare them.
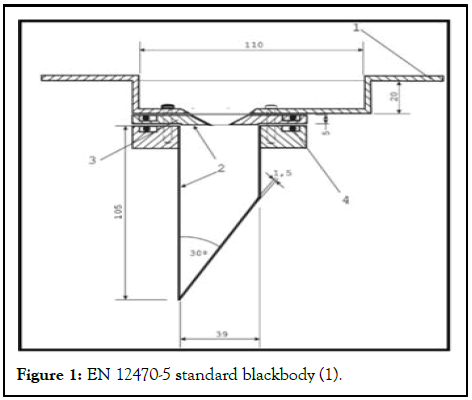
Figure 1: EN 12470-5 standard blackbody (1).
The dimensions displayed in the Figure 1 are in millimeters [19]. The number 1 in the Figure 1 is necessary cover for the cavity to fit inside the bath, number 2 is surface painter inside cavity, number 3 is an opening required for the infrared thermometer to read and number 4 is the O-Ring which is sealed connection rings. In number 2 seen in the Figure 2, Nextel Primer 5523 coded primer should be used to prime the structure of the paint to be used here, and the inner surface should be primed before applying Nextel Velvet coating 811-21 black paint using a spray gun.
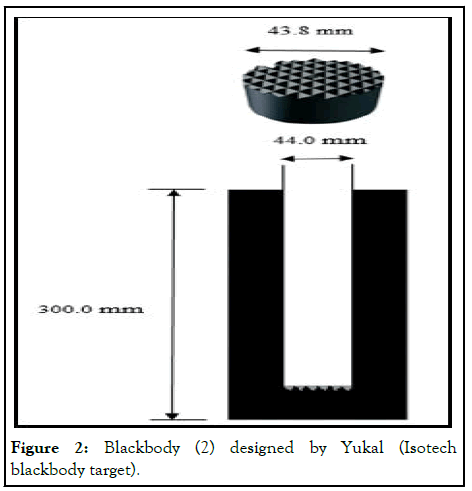
Figure 2: Blackbody (2) designed by Yukal (Isotech blackbody target).
Figure 2 shows a cylindrical chamber with measurements of 44.0 mm diameter and 300 mm length painted on the interior with black enamel paint and a widely viable Isotech blackbody target aim with dimensions of 43.8 mm width and 18 mm thickness. According to the Isotech technical criteria, this results in an overall emissivity of 0.99.
The bath (Figure 3a) in which the unique cavity is placed is adjusted to the lowest temperature of the measurement range, 36°C, and the reference thermometer is immersed to the same depth in the PRT (platinum resistance thermometer) bath without contacting the cavity. The measurements begin at 36.0°C after the cavity has reached equilibrium in the water bath. It is done in two sets of ten measurements at 10 second intervals using both reference PRT and test infrared thermometers up to 41.0°C. The infrared thermometers (Figure 3b) which were used in this study focused to the blackbody target at a same level. During each degree measurement, the thermometer readings were taken every 10 seconds 20 times. The first set of measurements were conducted when the temperature in the water bath had stabilized and reached homogeneity. To measure the temperature of the blackbody, the infrared thermometer had to be inserted as deeply as possible into the hollow without contacting the cavity's edges. The infrared ear thermometer was inserted at the same level as infrared thermometer. All measurements were taken close to hollow at the same level to minimize the uncertainty. The experiment of infrared non-contact thermometers was adjusted to two different settings: Surface and body mode. The difference between the two modes is that their emissivity.
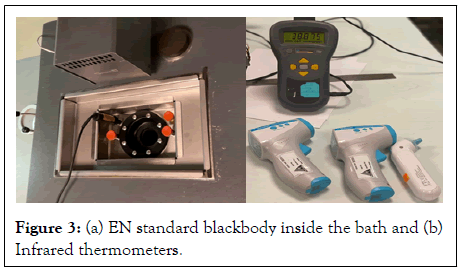
Figure 3: (a) EN standard blackbody inside the bath and (b) Infrared thermometers.
Measurements
First, blackbody 1 was used to compare the infrared ear and non-contact thermometers and their accuracy. The following temperatures were measured using blackbodies: 36°C, 37°C, 38° C, 39°C, 40°C, and 41°C. Experimental data consist of several categories; infrared ear thermometer tested with blackbody 1 and 2, IR non-contact thermometer tested with blackbody 1 and 2, also with two different modes (Surface and Body) which can be observed in Table 1. Data for the infrared ear thermometer was obtained several times to test repeatability and the most accurate values were recorded.
| Reference value (°C) | Test value (°C) |
|---|---|
| IR ear thermometer blackbody 1 | |
| 36 | 36.3 |
| 37 | 37 |
| 38 | 37.8 |
| 39 | 38.9 |
| 40 | 40 |
| 41 | 40.8 |
| IR ear thermometer blackbody 2 | |
| 36 | 36 |
| 37 | 37.1 |
| 38 | 37.9 |
| 39 | 38.9 |
| 40 | 39.9 |
| 41 | 40.8 |
| IR non-contact thermometer blackbody 1 (Surface) | |
| 36 | 35.8 |
| 37 | 36.8 |
| 38 | 37.8 |
| 39 | 38.8 |
| 40 | 39.9 |
| 41 | 40.9 |
| IR non-contact thermometer blackbody 2 (Surface) | |
| 36 | 35.9 |
| 37 | 36.9 |
| 38 | 38 |
| 39 | 38.9 |
| 40 | 39.9 |
| 41 | 41 |
| IR non-contact thermometer blackbody 1 (Body) | |
| 36 | 37.5 |
| 37 | 38.5 |
| 38 | 39.5 |
| 39 | 40.6 |
| 40 | 41.4 |
| 41 | 40.5 |
| IR non-contact thermometer blackbody 1 (Body) | |
| 36 | 37.7 |
| 37 | 38.7 |
| 38 | 39.6 |
| 39 | 40.7 |
| 40 | 41.5 |
| 41 | 40.6 |
Table 1: Experimental data acquired.
Table 1 displays result of experimentation and data acquired. The values taken were non nominal and weren’t comparable.
Therefore, using an Excel sheet all values were recorded and then a scatter plot was inserted. A polynomial trendline of 4th degree was inserted into the graph to get equation that will give comparable values. Thus, by adding nominal reference values into the equation obtained the test values that are comparable were achieved (Figure 4).
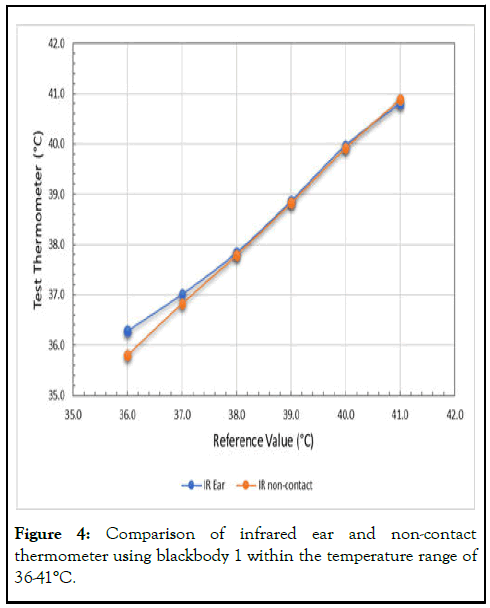
Figure 4: Comparison of infrared ear and non-contact thermometer using blackbody 1 within the temperature range of 36-41°C.
Figure 4 shows the infrared ear and non-contact thermometer data acquired using blackbody 1. It is observed that infrared ear and non-contact thermometers agree with each other when using blackbody 1. Nevertheless, while measuring the 36°C the values were much higher than that of reference. This is speculated to be due to the drift of the ear thermometer used in research. During another research (Turkish airlines and YUKAL) this drift was observed while conducting the research at 36°C. The same drift occurred with both blackbodies thus proving that it was the equipment rather than a mistake during research. In an article comparing two blackbodies for an infrared ear thermometer a drift occurred in the results of local blackbody and a standard blackbody. In this research the same drift occurred with both blackbodies thus proving that it was the equipment rather than a mistake during research. Therefore, this drift is assumed to have no substantial effect on the results of a blackbody comparison in either case. Nonetheless, this indicates that while using infrared ear thermometers drifts occur thus frequent calibration is required (Figure 5).
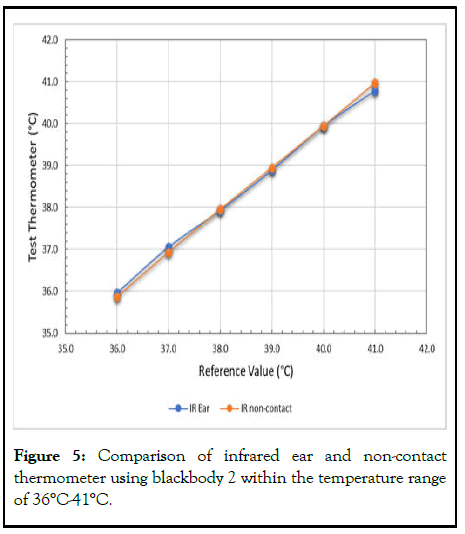
Figure 5: Comparison of infrared ear and non-contact thermometer using blackbody 2 within the temperature range of 36°C-41°C.
Figure 5 displays the data achieved using blackbody 2 with infrared ear and non-contact thermometer. Since the conditions of both blackbody readings are same Figure 4 and 5 can be compared as well. When compared one can see that the values are similar and in agreement therefore, during calibration instead of an EN 12470-5, a standard blackbody, a non-standard blackbody could also be used successfully.
For different blackbodies, the measurement uncertainty calculation was performed for each infrared thermometer. Because it is not enough to know that the measured value is correct by comparing it with the reference value, it is necessary to calculate the measurement uncertainty estimation correctly in order to ensure the reliability of the measurements. The uncertainty calculation in this study was made according to the EA-4/02 guideline. All parameters affecting the measurement are taken into account by adding them to the uncertainty budget. After determining the parameters affecting the uncertainty, A and B type uncertainty parameters and distribution types were determined. After the total uncertainty value was calculated, the expanded uncertainty value was determined at the 95% confidence level.
All components that affect the measurement uncertainty of clinical type thermometers are listed in Table 2.
| Uncertainty component | Uncertainty | Statistical distribution | Standard uncertainty (°C) | Variance ( m°C) |
|---|---|---|---|---|
| Reference therm. Drift (1 Year) | 1.00E-03 | Rectangular | 5.87E-03 | 3.30E-05 |
| Reference therm. Uncertainty | 2.00E-03 | Normal | 1.00E-03 | 1.00E-06 |
| Reference therm. Stability | 0.00E+00 | Normal | 0.00E+00 | 0.00E+00 |
| Indicator uncertainty | 4.00E-05 | Normal | 2.00E-04 | 4.00E-08 |
| Indicator shift | 1.35E-04 | Rectangular | 7.80E-04 | 6.09E-07 |
| Blackbody homogeneity | 5.00E-03 | Rectangular | 5.00E-03 | 2.50E-05 |
| Blackbody stability | 4.00E-03 | Normal | 4.00E-03 | 1.60E-05 |
| IRET repeatability | 9.43E-02 | Normal | 9.43E-02 | 8.89E-03 |
| IRET resolution | 1.00E-01 | Rectangular | 5.78E-02 | 3.34E-03 |
| IRET reproducibility | 0.00E+00 | Rectangular | 0.00E+00 | 0.00E+00 |
| Black body emissivity | 7.00E-02 | Normal | 3.50E-02 | 1.23E-03 |
| Combined standard uncertainty, Uc | 0.07 | |||
| Expanded uncertainty U=kUc=2(0.12) | 0.14 m°C | |||
Table 2: Uncertainty budget for infrared non-contact thermometer (Body).
Table 3 provides all uncertainties of all thermometers and their arranged settings. According to the standards of ASTM 1998, EN 2003 and JIS 2001 an infrared thermometer should be reliable within the range of ± 0.2°C [20]. This value is in accordance with in experiment operating range of 36°C to 41°C as the standard operating range is 35.5°C to 42°C. The result of same degree but different conditions shows slight difference however; this is an uncertainty resulting from the positional difference while conducting the experiment. As it was confirmed in previous research that the positioning of the thermometer on blackbody results in a difference up to 0.2°C. Because it was measured and conducted by hand the position of thermometers was not precise and following on each step. Therefore, the uncertainties of the thermometers and different categories have slight variance.
| Nominal values (Reference) | IR ear therm. Unc. (Blackbody 1) | IR ear therm. Unc. (Blackbody 2) | IR non-contact therm. Unc.-surface (Blackbody 1) | IR non-contact therm. Unc.-surface (Blackbody 2) | IR non-contact therm. Unc.-body (Blackbody 1) | IR non-contact therm. Unc.-body (Blackbody 2) |
|---|---|---|---|---|---|---|
| 36°C | ± 0.14 | ± 0.14 | ± 0.23 | ± 0.14 | ± 0.14 | ± 0.14 |
| 37°C | ± 0.14 | ± 0.16 | ± 0.14 | ± 0.18 | ± 0.17 | ± 0.15 |
| 38°C | ± 0.17 | ± 0.14 | ± 0.17 | ± 0.14 | ± 0.17 | ± 0.14 |
| 39°C | ± 0.17 | ± 0.17 | ± 0.14 | ± 0.14 | ± 0.16 | ± 0.18 |
| 40°C | ± 0.14 | ± 0.15 | ± 0.17 | ± 0.14 | ± 0.17 | ± 0.14 |
| 41°C | ± 0.19 | ± 0.14 | ± 0.16 | ± 0.14 | ± 0.14 | ± 0.14 |
Table 3: Uncertainty values of thermometers.
In summary, it has been found that a low-cost non-standard black body designed for the calibration of radiation thermometers is suitable for use in the calibration of clinical thermometers. It was observed that the standard cavity, on the other hand, affected the measurements due to the problem in the coating thickness during the production phase and caused a deviation at the lowest temperature value of 36°C. It has been determined that providing standard parameters at the production stage causes the production process to prolong and some deviations in the measurements. It was a development that was detected during this study that clinical thermometer measurements could be measured with the same precision, except for radiation thermometers with ordinary black spray paint used inside the non-standard cavity.
However, the results of the designed cavity were good agreement with the results of contact and non-contact thermometers, and their expanded uncertainties did not exceed 0.2°C as stated in the manufacturer's declarations. In summary, we can say that the obtained results provide a valid and effective method for ensuring traceability of the designed cavity for calibration purposes.
I wish to thank Dr. Richard Rusby from National Physics Laboratory (NPL) for help and comments. I would also like to thank Maria Aiordachioaiei for help during this study.
[Crossref] [Google Scholar] [PubMed]
[Crossref] [Google Scholar] [PubMed]
[Crossref] [Google Scholar] [PubMed]
[Crossref] [Google Scholar] [PubMed]
[Crossref] [Google Scholar] [PubMed]
[Crossref] [Google Scholar] [PubMed]
[Crossref] [Google Scholar] [PubMed]
Citation: Alper MP (2024) Calibration Method of Clinical Type Infrared Thermometers and Estimation Uncertainty in Different Blackbody Cavities. J Biomed Eng Med Dev. 09:285.
Received: 01-Aug-2023, Manuscript No. BEMD-23-25921; Editor assigned: 03-Aug-2023, Pre QC No. BEMD-23-25921 (PQ); Reviewed: 18-Aug-2023, QC No. BEMD-23-25921; Revised: 05-Mar-2024, Manuscript No. BEMD-23-25921 (R); Published: 12-Mar-2024 , DOI: 10.35248/2475-7586.24.09.295
Copyright: © 2024 Alper MP. This is an open-access article distributed under the terms of the Creative Commons Attribution License, which permits unrestricted use, distribution, and reproduction in any medium, provided the original author and source are credited.